引言
开源音视频处理工具FFMPEG以其强大的功能而在音视频领域著称,从音视频格式转换、裁剪、拼接、提取字幕到提取视频流,编解码等无所不能,本页汇集整理FFmpeg常用命令。
常用命令示例
ffmpeg -h   // 帮助
ffmpeg -version // 版本信息
ffmepg -devices // 查看可用设备
ffmpeg -i input.mp4 // 查看视频信息
ffmpeg 命令行参数解析
00:00:46.61 视频时长
3949kb/s 码率
h264:视频编码格式
avc1:苹果公司开发的复合h264规范的格式
yuv420p:视频颜色编码方式
960x400:分辨率
SAR 1:1 :图像采集时,采集的宽高点阵的点数比值
DAR:图像宽高比
PAR:像素的长宽比
23.98 fps: 帧率
23.98 tbr: 帧率
24k tbn: 文件层的时间精度1S=24k,一秒增加24k
47.95 tbc:视频层的时间精度1S=47.95,一秒增加47.95
aac:音频编码格式
mp4a:
stereo:立体声
fltp:音频帧格式
常用命令示例
不显示FFmpeg的banner信息
$ ffmpeg -i video.mp4 -hide_banner
基本格式转换
ffmpeg.exe -i input.mkv -vcodec h264 -b:v 1.5M -acodec aac -b:a 48K output.mp4
-i 后面是输入文件(编码方式任意,可以通过ffprobe查看)
-vcodec 转换目标格式
-b:v 设置视频流码率(1.5M)
-b:a 设置音频流码率(48K)
output.mp4 输出mp4格式封装。
视频与gif互转
将视频 MP4 转化为 GIF
ffmpeg -i test.mp4 test.gif

将视频中的一部分转换为GIF
// 从视频中第10秒开始,截取时长为3秒的片段转化为 gif
ffmpeg -ss 00:00:10 -t 3  -i test.mp4 test.gif

转化高质量 GIF
// 默认转化是中等质量模式,若要转化出高质量的 gif,可以修改比特率
ffmpeg -i test.mp4 -b:v 2048k test.gif

将 GIF 转化为 MP4
ffmpeg -f gif -i test.gif test.mp4
// 也可以将 gif 转为其他视频格式
ffmpeg -f gif -i test.gif test.mpeg
ffmpeg -f gif -i test.gif test.mkv

视频提取帧,保存为图片
// 将视频提取10帧
ffmpeg -i test.mp4 -r 10 %06d.jpg;
添加字幕
ffmpeg -i input.mp4 -vf subtitles=text.srt output.mp4
注意:如果想要输入subtitle文件的绝对路径,需要这样写:
ffmpeg.exe -i "C:\Users\Engine - Turboshaft.mp4" -vf subtitles=\'D:\input.ass\' output.mp4
或者
ffmpeg.exe -i "C:\Users\Engine - Turboshaft.mp4" -vf "subtitles=\'D:\input.ass\'" output.mp4
其中subtitle的绝对路径用斜杠和单引号包住。

类似
ffmpeg.exe -i "C:\Turboshaft.mp4" -filter_complex subtitles=\'D:\input.ass\' output.mp4
或者
ffmpeg.exe -i "C:\Turboshaft.mp4" -filter_complex "subtitles=\'D:\input.ass\'" output.mp4
提取字幕
提取字幕流
1)原始文本输出
ffmpeg -i output.mkv -an -vn -bsf:s mov2textsub -scodec copy -f rawvideo sub.txt
ffmpeg -i output.mkv -an -vn -c:s copy -f rawvideo -map 0:s sub2.txt
2)ass格式输出
ffmpeg -i output.mkv -an -vn -scodec copy sub3.ass
视频剪切
ffmpeg -ss 00:00:15 -t 00:00:05 -i input.mp4 -vcodec copy -acodec copy output.mp4
// -ss表示开始切割的时间,-t表示要切多少。上面就是从15秒开始,切5秒钟出来
码率控制
ffmpeg -i input.mp4 -b:v 2000k output.mp4
ffmpeg -i input.mp4 -b:v 2000k -bufsize 2000 output.mp4 // -bufsize 缓冲区
ffmpeg -i input.mp4 -b:v 2000k -bufsize 2000k -maxrate 2500k -minrate 1500k output.mp4 // 最大最小域值
提取视频流
ffmpeg -i input.mp4 -vcodec copy -an -f m4v output.h264视频缩放
   将输入的1920x1080缩小到960x540输出:

ffmpeg -i input.mp4 -vf scale=960:540 output.mp4

如果540不写,写成-1,即scale=960:-1, 保持原始的宽高比进行缩放

ffmpeg -i input.mp4 -vf scale=960:-1 output.mp4 // 保持宽高比,注意宽要能被2出尽,不然报错
视频旋转
顺时针旋转画面90度
ffmpeg -i test.mp4 -vf "transpose=1" out.mp4 或者
ffmpeg -i input.mp4 -vf transpose=1 output.mp4

逆时针旋转画面90度
ffmpeg -i test.mp4 -vf "transpose=2" out.mp4

顺时针旋转画面90度再水平翻转
ffmpeg -i test.mp4 -vf "transpose=3" out.mp4

逆时针旋转画面90度水平翻转
ffmpeg -i test.mp4 -vf "transpose=0" out.mp4

水平翻转视频画面
ffmpeg -i test.mp4 -vf hflip out.mp4

垂直翻转视频画面
ffmpeg -i test.mp4 -vf vflip out.mp4
添加水印
在test.mp4左上角10,10的位置添加水印图片test.png,同时在根目录产出一个watermark.mp4的视频
ffmpeg -i test.mp4 -i test.png -filter_complex “overlay=10:10” watermark.mp4

添加水印同时设置水印大小(缩放)功能命令
ffmpeg.exe -i input.mp4 -i warter.png -filter_complex "[1:v]scale=120:120[s];[0:v][s]overlay=10:10" out.mp4

ffmpeg -i input.mp4 -i logo.png -filter_complex overlay output.mp4
ffmpeg -i input.mp4 -i logo.png -filter_complex overlay=W-w output.mp4 // 右上角
ffmpeg -i input.mp4 -i logo.png -filter_complex overlay=0:H-h output.mp4 // 左下角
ffmpeg -i input.mp4 -i logo.png -filter_complex overlay=W-w:H-h output.mp4 // 右下角
去除水印
ffmpeg -i input.mp4 -vf delogo=1:1:144:144:1 output.mp4 // -vf delogo=x:y:w:h[:show], x:y离左上角坐标,设0报错,w:h logo宽高,show设置一个绿色的矩形,默认0添加字幕同时添加水印
一次转换完成,字幕水印同时添加。(水印提前制作好大小,没有缩放)

ffmpeg -i input.mp4 -i warter.png -filter_complex "[0:v][1:v]overlay[logo];[logo]subtitles=av1.srt[sub]" -map [sub] -map 0:a output.mp4

如果想添加水印时设置水印大小
ffmpeg -i input.mp4 -i warter.png -filter_complex "[1:v]scale=120:120[simg];[0:v][simg]overlay[logo];[logo]subtitles=av1.srt[sub]" -map [sub] -map 0:a output.mp4

解析
[1:v]这个里头两个参数,1表示的是操作对象的编号。在本例中0就是原始视频文件input.mp4,warter.png,后面如果还有第二张水印图片,就是2,另一个参数v表示操作对象里的视频信息(video的缩写)。 simg是表示经过第一层过滤器后的对象名字(自定义)。分号前面第一句[1:v]scale=120:120[simg],表示对输入参数中编号为1的图片(warter.png)进行大小缩放,设置为120x120大小,输出图片名字为simg。第二句[0:v][simg]overlay[logo]表示把simg和原始输入视频编号为0,视频,进行叠加,输出视频名字为logo。注意后一个对象叠加到前一个上,后一个对象在上层, 即simg在上。

另外:
水印移动:可以添加参数overlay=0+t*10:0,表示水印随着时间移动x轴坐标。
特定时间显示水印:overlay=x='if(gte(t,2),10,NAN)':0;
 注解: if(条件,条件为true时的值,条件为false时的值), 表达式gte(x,y)。如果x大于等于y则表达式的值为1,反之为0。
 if(gte(t,2),10,NAN)的意思就是,当时间大于等于2秒时,水印x位置为10,反之不显示水印。

 示例:
 ffmpeg -i input.mp4 -i warter.png -filter_complex "[1:v]scale=120:120[s];[0:v][s]overlay=x='if(gte(t,0), 0+mod(t,5)*20, NAN)':y=0[logo];[logo]subtitles=av1.srt[sub]" -map [sub] -map 0:a output.mp4
 显示效果见下图:
添加文字水印
   以MAC 为例命令行,支持汉字水印,字体文件更加自己系统自行选择
   ffmpeg -y -i 1.mp4 -vf "drawtext=fontfile=/System/Library/Fonts/PingFang.ttc: text='公众号\:影音探长':x=10:y=10:fontsize=16:fontcolor=DarkGreen:shadowy=2" out.mp4

   win10, 微软雅黑加粗,copy /c/Windows/Fonts/msyhbd.ttc 到ffmpeg目录

   ./ffmpeg.exe -y -i 1.mp4 -vf "drawtext=fontfile=msyhbd.ttc: text='公众号\: xxx':x=80:y=32:fontsize=18:fontcolor=White" out.mp4
截取视频图像
ffmpeg -i input.mp4 -r 1 -q:v 2 -f image2 pic-%03d.jpeg // -r 每一秒几帧,-q:v 存储jpeg的图像质量,一般2是高质量
ffmpeg -i input.mp4 -ss 00:00:20 -t 10 -r 1 -q:v 2 -f image2 pic-%03d.jpeg //抽取10帧图片
随便挑一张,转为YUV:
ffmpeg -i pic-001.jpeg -s 1440x1440 -pix_fmt yuv420p xxx3.yuv
图片序列与视频转换
ffmpeg -i 001.mp3 -i example.%d.jpg -s 1024x768 -vcodec mpeg4 rebuild.mp4 // 把图片序列帧和音频文件利用mpeg4编码方式合成视频文件darkdoor.avi
ffmpeg -i input.mp4 example.%d.jpg // 把视频文件导出成序列帧
ffmpeg 控制视频profile
ffmpeg -i input.mp4 -profile:v baseline -level 3.0 output.mp4
ffmpeg -i input.mp4 -profile:v main -level 4.2 output.mp4
ffmpeg -i input.mp4 -profile:v high -level 5.1 output.mp4
如果ffmpeg编译时加了external的libx264,可以这样写:
ffmpeg -i input.mp4 -c:v libx264 -x264-params "profile=high:level=3.0" output.mp4

从压缩比例来说,baseline< main < high,对于带宽比较局限的在线视频,可能会选择high,但有些时候,做个小视频,希望所有的设备基本都能解码(有些低端设备或早期的设备只能解码baseline),那就牺牲文件大小吧,用baseline。自己取舍吧!
解码H.264/H.265码流(解码)
ffmpeg -i input_file.264 -vframes 100 output.yuv
ffmpeg -i input_file.265 -vframes 100 output.yuv
转换成H264码流(编码)
ffmpeg -i input_file.yuv -vcodec h264 output_file.264

其中 -i 表示输入文件, -vcodec h264 表示视频编解码方式为 H264。
编码质量
ffmpeg -i input -c:v libx264 -profile:v main -preset:v fast -level 3.1 -x264opts crf=18

 编码效率和视频质量的取舍:强行配置biterate,或者强行配置profile/level,还有2个参数可以控制编码效率。
一个是preset,一个是crf。preset也挺粗暴,基本原则就是,如果你觉得编码太快或太慢了,想改改,可以用profile。
preset有如下参数可用:
ultrafast, superfast, veryfast, faster, fast, medium, slow, slower, veryslow and placebo.
编码加快,意味着信息丢失越严重,输出图像质量越差。
CRF(Constant Rate Factor): 范围 0-51: 0是编码毫无丢失信息, 23 is 默认, 51 是最差的情况。相对合理的区间是18-28.
值越大,压缩效率越高,但也意味着信息丢失越严重,输出图像质量越差
转换成H265码流(编码)
ffmpeg -i input_file -vcode hevc output_file

其中 -i 表示输入文件, -vcodec hevc 表示视频编解码方式为 H265,注意ffmpeg 中名称为 hevc,不是H265!
设置输出视频的分辨率
ffmpeg -i input_file -vcodec h264 -s 1280x720 output_file
其中 -s 表示分辨率。
设置输出文件的音视频比特率
ffmpeg -i input_file  -vcodec h264 -b:v 10M -b:a 128K output_file

其中 -b:v 10M 表示视频码率为10Mbps, -b:a 128K 表示音频码率为 128Kbps,注意FFMPEG对于码率控制,有时候不太准确,跟输入源有一定关系。
剪切某段视频
ffmpeg -ss 0:05:00 -t 0:1:30 -i input_file -vcodec copy -acodec copy output_file
ffmpeg -ss 300 -t 90  -i input_file -vcodec copy -acodec copy output_file

上面的两种方式等价,时间格式支持 HH:MM:SS或者秒数。 -ss 开始时间, -t 持续时间, -vcodec copy 保持原视频编码方式, -acodec copy 保持原音频编码方式。

注意:-vcodec copy与-c:v以及-codec:v 这三种写法的功能是一样的,具体可参考:[https://lists.ffmpeg.org/pipermail/ffmpeg-user/2017-February/035335.html](https://lists.ffmpeg.org/pipermail/ffmpeg-user/2017-February/035335.html "https://lists.ffmpeg.org/pipermail/ffmpeg-user/2017-February/035335.html")
分离音视频流保存为不同文件
ffmpeg -i input_file -vcodec copy -an output_file_video  //提取视频流
ffmpeg -i input_file -acodec copy -vn output_file_audio  //提取音频流
其中 -an 表示不处理音频, -vn 表示不处理视频。
合并多个音视频文件为一个文件
ffmpeg –i video_file –i audio_file –vcodec copy –acodec copy output_file 提取视频图像保存为图片文件(将视频分解为单幅图片)
ffmpeg –i input_file –r 1 –f image2 image-%3d.jpeg        //提取图片

其中 -r 表示提取图像的频率,-f 表示输出格式, %3d 表示文件命名方式(也即生成的图片名为 image-001.jpeg, image-002.jpeg, …, image-999.jpeg)。
转换成YUV原始文件
ffmpeg -i input_file -vcodec rawvideo -an output_file_yuv
ffmpeg -i input_file -vcodec rawvideo -an -pix_fmt yuv420p10le output_file.yuv
输出10bit yuv420p yuv文件
提取指定帧数的YUV文件
   ./ffmpeg.exe -ss 00:01:57 -t 1 -i in.mp4 -an -c:v rawvideo -pix_fmt yuv420p -vframes 3 out.yuv

   从00:01:57秒开始的1秒视频内,提取3帧yuv图像

    ./ffmpeg.exe -ss 00:01:57 -t 1 -i in.mp4 -an -c:v rawvideo -pix_fmt rgb24 -vframes 3  out.rgb
     ./ffmpeg.exe -ss 00:01:57 -t 1 -i in.mp4 -an -c:v rawvideo -pix_fmt gbrp10le -vframes 3 out.rgb

     gbrp10le : 10bit 的planer rgb
YUV 8bit 转 10bit
ffmpeg.exe -s 1280x720 -i 720p.yuv -pix_fmt yuv420p10le 10bit_720p.yuv
yuv420p 8bit 转 10bit

用ffplay 播放进行测试
./ffplay.exe -s 1280x720 -pix_fmt yuv420p10le -i 10bit_720p.yuv
YUV序列转出AVI文件
ffmpeg –s w*h –pix_fmt yuv420p –i input.yuv –vcodec mpeg4 output.avi 控制关键帧间隔和B帧
ffmpeg –i input_file  –vcodec h264 –bf 0 –g 25 –s 854x480 –an –f m4v output_file

其中-bf 控制B帧数目,-g 控制关键帧间隔, -f 控制文件格式(format,注意与codec的区别)。
多个视频文件拼接
首先创建一个需要拼接的文件,例如 concat.txt,内容如下:

file ‘orig_20160616113303_0.avi’
file ‘orig_20160616113303_1.avi’

然后执行如下命令

ffmpeg  -f concat -i concat.txt  -c copy orig_20160616113303_merge.avi
YUV处理相关命令(持续更新ing)
查看ffmpeg支持哪些yuv格式的转换
ffmpeg -pix_fmts
ffmpeg转换yuv格式命令
ffmpeg -pix_fmt yuv420p -s 176x144 -i carphone_qcif.yuv -pix_fmt nv12 carphone_qcif_nv12.yuv ffmpeg命令行yuv缩放命令
ffmpeg -s:v 1920x1080 -r 25 -i input.yuv -vf scale=960:540 -c:v rawvideo -pix_fmt yuv420p out.yuv ffmpeg解码码流命令
ffmpeg -i 720P.264 -s 1280x720 -pix_fmt yuv422p 720P-out.yuv
ffmpeg -i 720P.264 -vframes 300  720P-out.yuv    //指定解码的帧数
简化版:ffmpeg -i 720P.264 720P-out.yuv

注意不同选项的顺序,-s选项放在-i后面,指定不同分辨率时,在解码后进行了缩放。
ffmpeg yuv转avi
ffmpeg -s wxh -pix_fmt yuv420p -i input.yuv -vcodec mpeg4 output.avi
ffmpeg -s wxh -pix_fmt yuv420p -i input.yuv -vcodec h264 output.avi
ffmpeg 裸码流转avi
ffmpeg -f h264 -i source.264 -c:v libx264 -an dest.avi
Use -c:v copy instead to copy the source stream without re-encoding
ffmpeg avi转裸码流
提取裸码流

ffmpeg.exe -i BQSquare_416x240_37.avi -f rawvideo -vcodec copy xx.264

提取若干帧数码流

ffmpeg.exe -i BQSquare_416x240_37.avi -f rawvideo -vcodec copy -vframes 100 xx.264

对于提取特定的帧,需要用特殊的方法:假设提取260帧,帧率是26, 则可用-ss 10.0 其中10.0=260/26
YUV裁剪功能
Extract some YUV frames from large yuv File
从第0帧开始截取30帧:
ffmpeg -s widthxheight -i input.yuv -c:v rawvideo -filter:v "select='gt(n\, -1)'" -vframes 30 out30.yuv

或者:

ffmpeg -s widthxheight -i input.yuv -c:v rawvideo -filter:v "select='between(n\, 0\, 29)'" out30.yuv

或者:

ffmpeg -r 1 -ss 0 -i input.yuv -vcodec copy -vframes 30 output.yuv

中间截取帧(截取从第30帧到第100帧):

ffmpeg -s widthxheight -i input.yuv -c:v rawvideo -filter:v "select='between(n\, 30\, 100)'" out.yuv

根据时间截取帧(截取从第10秒到第20秒 ):

//Select only frames contained in the 10-20 time interval:
//select=between(t\,10\,20)
ffmpeg -s widthxheight -i input.yuv -c:v rawvideo -filter:v "select='between(t\, 10\, 20)'" out.yuv

参考自: [https://blog.csdn.net/listener51/article/details/82025541](https://blog.csdn.net/listener51/article/details/82025541 "https://blog.csdn.net/listener51/article/details/82025541")
提取YUV数据
ffmpeg.exe -ss 00:02:45 -t 00:00:18  -i 8k.mp4 -an -c:v rawvideo -pix_fmt yuv420p 8k.yuv

ffmpeg -i killer.mp4 -an -c:v rawvideo -pix_fmt yuv420p ouy.yuv

参数说明
-c:v rawvideo 指定将视频转成原始数据
-pixel_format yuv420p 指定转换格式为yuv420p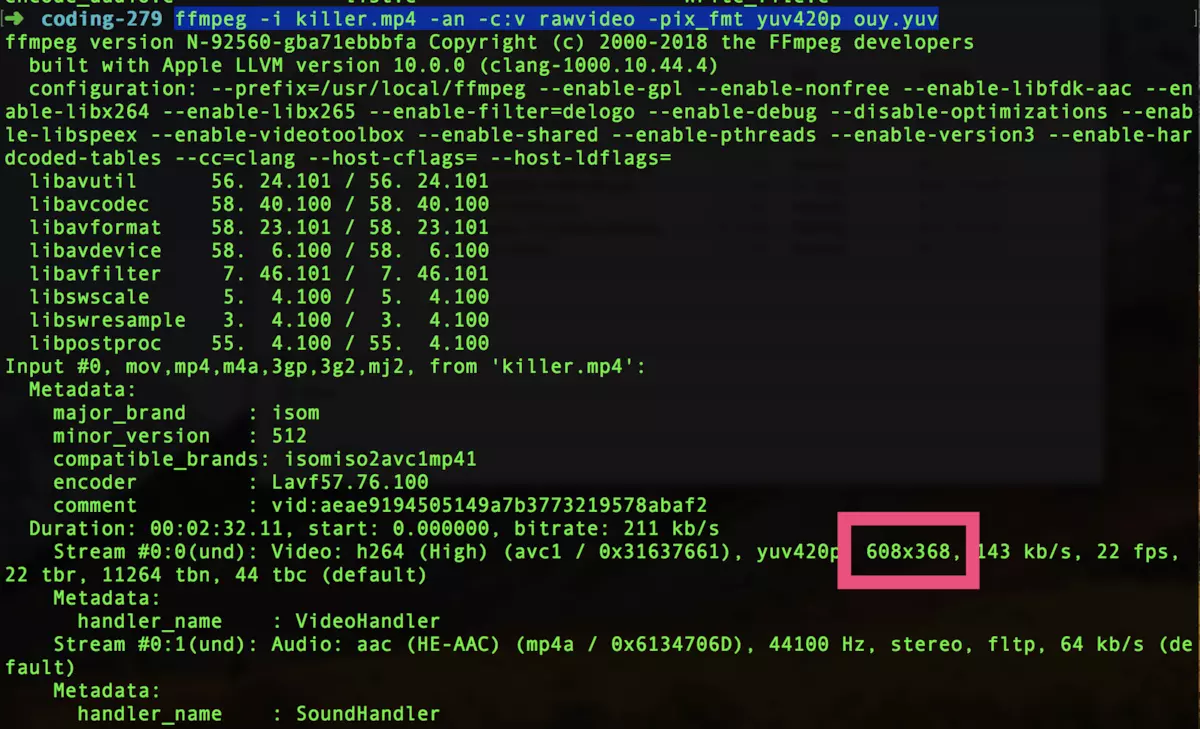
从日志中可以看出,像素格式:yuv420p,分辨率:608x368,使用ffplay播放一下。需要指定分辨率,这个时候不需要指定视频格式了,ffplay默认像素格式格式就是yuv420p。
ffplay -s 608x368 ouy.yuv提取PCM数据
ffmpeg -i killer.mp4 -vn -ar 44100 -ac 2 -f s16le out.pcm
参数说明:
-ar:指定音频采样率 44100 即44.1KHz
-ac:指定音频声道channel 2 为双声道
-f:数据存储格式 s:Signed 有符号的, 16: 每一个数值用16位表示, l: little, e: end

使用ffplay播放
ffplay -ar 44100 -ac 2 -f s16le out.pcm
FFmpeg 推流:flv直播流
ffmpeg -re -i 1.mp4 -vcodec copy -acodec copy -b:v 800k -b:a 32k -f flv rtmp://localhost/live
- localhost, 本机,可以设置ip地址或者域名
修改视频播放速度
ffmpeg -i input.mp4 -vf "setpts=0.5*PTS" output.mp4
该命令调整视频2倍速播放,然后输出。

$ ffmpeg -i input.mp4 -vf "setpts=4.0*PTS" output.mp4
减小视频播放速度。 乘以一个参数大于1的数。
FFMPEG常用参数说明
主要参数:
-i 设定输入流
-f 设定输出格式
-ss 开始时间
-formats 查看所有支持的容器格式
-codecs 查看所有编解码器
-filters 查看所有可用的filter
-pix_fmts 查看所有支持的图片格式
-sample_fmts 查看所有支持的像素格式
-i input_file 查看媒体文件input_file的信息(注意后面不再接其它参数,例如: ffmpeg -i test.mp4,查看 test.mp4视频信息)

视频参数:
-b 设定视频流量,默认为200Kbit/s
-r 设定帧速率,默认为25
-s 设定画面的宽与高
-aspect 设定画面的比例
-vn 不处理视频
-vcodec 设定视频编解码器,未设定时则使用与输入流相同的编解码器

音频参数:
-ar 设定采样率
-ac 设定声音的Channel数
-acodec 设定声音编解码器,未设定时则使用与输入流相同的编解码器
-an 不处理音频
ffmpeg 帮助
    Getting help: 帮助
        -h      -- print basic options
        -h long -- print more options
        -h full -- print all options (including all format and codec specific options, very long)
        -h type=name -- print all options for the named decoder/encoder/demuxer/muxer/filter/bsf
        See man ffmpeg for detailed description of the options.

    Print help / information / capabilities:
    -L                  show license
    -h topic            show help
    -? topic            show help
    -help topic         show help
    --help topic        show help
    -version            show version
    -buildconf          show build configuration
    -formats            show available formats
    -muxers             show available muxers
    -demuxers           show available demuxers
    -devices            show available devices
    -codecs             show available codecs
    -decoders           show available decoders
    -encoders           show available encoders
    -bsfs               show available bit stream filters
    -protocols          show available protocols
    -filters            show available filters
    -pix_fmts           show available pixel formats
    -layouts            show standard channel layouts
    -sample_fmts        show available audio sample formats
    -colors             show available color names
    -sources device     list sources of the input device
    -sinks device       list sinks of the output device
    -hwaccels           show available HW acceleration methods

    Global options (affect whole program instead of just one file:
    -loglevel loglevel  set logging level
    -v loglevel         set logging level
    -report             generate a report
    -max_alloc bytes    set maximum size of a single allocated block
    -y                  overwrite output files
    -n                  never overwrite output files
    -ignore_unknown     Ignore unknown stream types
    -filter_threads     number of non-complex filter threads
    -filter_complex_threads  number of threads for -filter_complex
    -stats              print progress report during encoding
    -max_error_rate maximum error rate  ratio of errors (0.0: no errors, 1.0: 100% errors) above which ffmpeg returns an error instead of success.
    -bits_per_raw_sample number  set the number of bits per raw sample
    -vol volume         change audio volume (256=normal)

    Per-file main options:
    -f fmt              force format
    -c codec            codec name
    -codec codec        codec name
    -pre preset         preset name
    -map_metadata outfile[,metadata]:infile[,metadata]  set metadata information of outfile from infile
    -t duration         record or transcode "duration" seconds of audio/video
    -to time_stop       record or transcode stop time
    -fs limit_size      set the limit file size in bytes
    -ss time_off        set the start time offset
    -sseof time_off     set the start time offset relative to EOF
    -seek_timestamp     enable/disable seeking by timestamp with -ss
    -timestamp time     set the recording timestamp ('now' to set the current time)
    -metadata string=string  add metadata
    -program title=string:st=number...  add program with specified streams
    -target type        specify target file type ("vcd", "svcd", "dvd", "dv" or "dv50" with optional prefixes "pal-", "ntsc-" or "film-")
    -apad               audio pad
    -frames number      set the number of frames to output
    -filter filter_graph  set stream filtergraph
    -filter_script filename  read stream filtergraph description from a file
    -reinit_filter      reinit filtergraph on input parameter changes
    -discard            discard
    -disposition        disposition

    Video options:
    -vframes number     set the number of video frames to output
    -r rate             set frame rate (Hz value, fraction or abbreviation)
    -s size             set frame size (WxH or abbreviation)
    -aspect aspect      set aspect ratio (4:3, 16:9 or 1.3333, 1.7777)
    -bits_per_raw_sample number  set the number of bits per raw sample
    -vn                 disable video
    -vcodec codec       force video codec ('copy' to copy stream)
    -timecode hh:mm:ss[:;.]ff  set initial TimeCode value.
    -pass n             select the pass number (1 to 3)
    -vf filter_graph    set video filters
    -ab bitrate         audio bitrate (please use -b:a)
    -b bitrate          video bitrate (please use -b:v)
    -dn                 disable data

    Audio options:
    -aframes number     set the number of audio frames to output
    -aq quality         set audio quality (codec-specific)
    -ar rate            set audio sampling rate (in Hz)
    -ac channels        set number of audio channels
    -an                 disable audio
    -acodec codec       force audio codec ('copy' to copy stream)
    -vol volume         change audio volume (256=normal)
    -af filter_graph    set audio filters

    Subtitle options:
    -s size             set frame size (WxH or abbreviation)
    -sn                 disable subtitle
    -scodec codec       force subtitle codec ('copy' to copy stream)
    -stag fourcc/tag    force subtitle tag/fourcc
    -fix_sub_duration   fix subtitles duration
    -canvas_size size   set canvas size (WxH or abbreviation)
    -spre preset        set the subtitle options to the indicated preset
小结
ffmpeg功能强大,参数配置众多,最好的方式查看它的命令行帮助文档,各个参数都有详细的说明,唯一的遗憾就是没有例子,对于初入媒体领域的人来说,门槛比较高。不明白的参数,可以多试试,再接合MediaInfo工具查看具体信息,通过VLC或者FFMPEG自带的 ffplay播放器播放,就容易理解了。
文档参考
https://blog.csdn.net/tj297202234/article/details/90484154
官网翻译文档:https://www.bookstack.cn/read/other-doc-cn-ffmpeg/ffmpeg-doc-cn-40.md
官方ffmpeg命令行参考文档:http://ffmpeg.org/ffmpeg.html
参考网址:https://stackoverflow.com/questions/33108985/ffmpeg-264-to-avi
更多ffmpeg命令使用可参考:
http://processors.wiki.ti.com/index.php/Open_Source_Video_Processing_Tools_-_MPlayer,_FFMpeg,_AviSynth,_MKVToolnix,_MP4Box#Downloads
http://ffmpeg.org/ffmpeg-filters.html#aselect_002c-select
https://lists.ffmpeg.org/pipermail/ffmpeg-user/2017-February/035335.html
https://www.bookstack.cn/read/other-doc-cn-ffmpeg/ffmpeg-doc-cn-40.md
https://blog.csdn.net/SoaringLee_fighting/article/details/56015567
https://www.suninf.net/2017/02/ffmpeg-command-usage.html
https://blog.csdn.net/soaringlee_fighting/article/details/80571673
https://www.ostechnix.com/20-ffmpeg-commands-beginners/
https://www.ostechnix.com/create-video-pdf-files-linux/